CUP BOTTOM acrylic pour painting ~ Reverse flower dip ~ Paint #WithMe

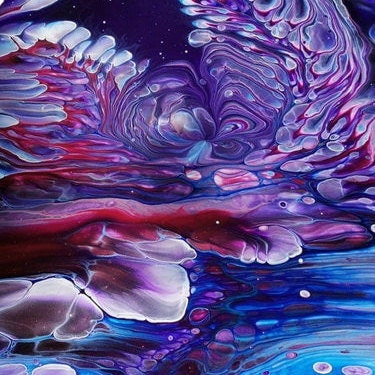
MUST SEE how crispy the edges of this lovely CUP BOTTOM acrylic pour flower painting are.
I love how different results you get with reverse flower dip technique you use different background colours. This one looks like it was broke the ice. ;)


PROCESS:
- Pour your base on canvas
- Put your FLOWER SHAPED DESERT CUP on the canvas with bottom up
- Pour paints on the bottom and use PEARL WHITE or some metallic paints between each colour to create petal - lacing effect
- Take off the cup
- Use SKEWER to draw some petal shapes
- Gently put PAPER NAPKIN or towel on canvas ( You can use dry or damped napkin)
- Lift one corner at the time and then gently lift it (the middle last)
- Torch it for air bubbles and to activate pearl white and metallic paints
- And here is your flower :)
TECHNIQUE: Reverse flower dip with paper napkin, Cup bottom pour
COLOURS I USED:
- Amsterdam sky blue light for the background
- Arties colours dioxazine purple
- Vallejo quinacridone magenta
- Vallejo cobalt violet light hue
- Maimeri light gold
- Pearl white
MATERIAL I USED:
- 10x10 inch canvas
- Acrylic paints mixed with pouring medium
- Flower shaped desert cup
- Paper napkin or towel
- Wooden skewer
- Palete knife
- Torch
My pearl white mixture:
1 part Vallejo pearl medium
1 part titanium white
2 parts pouring medium
All my paints are mixed with Boesner Guardi acrylic binder and acrylic emulsion.
My mixing paints video:
#FionaArt #MustSee #WithMe
2yt378.JPG
If you are interested in ONLINE PRIVATE CLASSES, you can contact me via Facebook Fiona Art or email zemljicr@gmail.com.
Link to my Etsy shop:
...

If you want to support my channel to keep on experimenting with new techniques you can do it through this link:

Or just like and subscribe to show some love.
Thank you!

You can follow me on
Facebok: https://www.facebook.com/Fionas-Art-b...
Instagram: @fionaacrylic

My personal page: https://fionaart.si/

Please understand that I am in no way responsible for the way you use your paint and mediums. Follow all safety instructions of the manufacturers, I can not be held liable.
Be careful and use the proper materials for your safety.

You can't use any content on my channel, unless I give you a permission!
 
Invitation to my LIVE AUCTION ~ Saturday, May 30th 2020 at 6pm EST ~ Acrylic pour painting

Here are the paintings that will be in my live auction!
Saturday, May 30th 2020 at 6pm eastern standard time!
Hope to see you there!

If you are interested in ONLINE PRIVATE CLASSES, you can contact me via Facebook Fiona Art or email zemljicr@gmail.com
 
BOTTLE BOTTOM acrylic pour painting ~ PRIMARY COLOURS ~ MUST SEE!!! ~ Paint #WithMe

You must see this AMAZING acrylic pour FLOWER painting!!! I used bottle bottom with five extra holes. Instead of my regular pearl white mixture I used just Vallejo pearl medium mixed with my pouring medium and I think that I like this effect, because colours remained vibrant.


PROCESS:
- Pour your base on canvas
- Put your BOTTLE BOTTOM on the canvas with bottom up
- Pour paints on the bottom and use PEARL or some METALLIC paints between each colour to create petal - lacing effect
- Take off the bottle bottom
- Use SKEWER to draw some petal shapes
- Gently put PAPER NAPKIN or towel on canvas ( You can use dry or damped napkin)
- Lift one corner at the time and then gently lift it (the middle last)
- Torch it for air bubbles and to activate pearl white and metallic paints
- And here is your flower :)
TECHNIQUE: Reverse flower dip with paper napkin, Cup bottom pour

3yt379.jpg
MATERIAL I USED:
- 8x8 inch gallery wrapped canvas
- Acrylic paints mixed with pouring medium
- Flower shaped desert cup
- Paper napkin or towel
- Wooden skewer
- Palete knife
- Torch
COLOURS I USED:
- Boesner black for the base coat
- Amsterdam primary cyan
- Amsterdam primary yellow
- Artina primary red
- Vallejo pearl medium
All my paints are mixed with Boesner Guardi acrylic binder and acrylic emulsion.
Be careful and use the proper materials for your safety.
1yt1379.JPG

You can't use any content on my channel, unless I give you a permission!
 
Fluorescent CUP BOTTOM reverse flower dip ~ Acrylic pour painting ~ MUST SEE ~ Paint #WithMe

Step by step CUP BOTTOM reverse flower dip acrylic pour painting with fluorescent paints.


PROCESS:
- Pour your base on canvas
- Put your cup on the canvas with bottom up
- Pour paints on the bottom and use pearl white or some metallic paints between each colour to create petal - lacing effect
- Take off the cup
- Use skewer to draw some petal shapes
- Gently put paper napkin or towel on canvas ( You can use dry or damped napkin)
- Lift one corner at the time and then gently lift it (the middle last)
- Torch it for air bubbles and to activate pearl white and metallics
- And here is your flower :)

TECHNIQUE: Reverse flower dip with paper napkin, Cup bottom pour

MATERIAL I USED:
- 10x10 inch canvas
- Acrylic paints mixed with pouring medium
- Flower shaped desert cup
- Paper napkin or towel
- Wooden skewer
- Palete knife
- Torch

COLOURS I USED:
- Boesner black
- Vallejo fluorescent magenta
- Amsterdam reflex orange
- Amsterdam reflex yellow
- Pearl medium

1yt380.jpg

All my paints are mixed with Boesner Guardi acrylic binder and acrylic emulsion.
If you are interested in ONLINE PRIVATE CLASSES, you can contact me via Facebook Fiona Art or email zemljicr@gmail.com.
Please understand that I am in no way responsible for the way you use your paint and mediums. Follow all safety instructions of the manufacturers, I can not be held liable.
Be careful and use the proper materials for your safety.

You can't use any content on my channel, unless I give you a permission!
 
CUP BOTTOM reverse dip on WOOD PANEL ~ Acrylic pour painting ~ Paint #WithMe


I put a coat of resin on this CUP BOTTOM reverse dip on WOOD PANEL acrylic pour painting. Wasn't sure how it will dry, but there is no cracks.
I like those panels, because they have an edge and it easy to resin them.

PROCESS:
- Pour your base on canvas
- Put your cup on the canvas with bottom up
- Pour paints on the bottom and use pearl white or some metallic paints between each colour to create petal - lacing effect
- Take off the cup
- Use skewer to draw some petal shapes
- Gently put paper napkin or towel on canvas ( You can use dry or damped napkin)
- Lift one corner at the time and then gently lift it (the middle last)
- Torch it for air bubbles and to activate pearl white and metallics
- And here is your flower :)

TECHNIQUE: Reverse flower dip with paper napkin, Cup bottom pour

2.JPG

MATERIAL I USED:
- 8x8 inch Cradled Wood Panel
- Acrylic paints mixed with pouring medium
- Flower shaped desert cup
- Paper napkin or towel
- Wooden skewer
- Palete knife
- Torch

COLOURS I USED:
- Boesner black for the base coat
- Amsterdam pale violet
- Vallejo fluorescent violet
- Vallejo fluorescent magenta
- Amsterdam persian rose
- Vallejo fluorescent blue
- Amsterdam sky blue light
- Pearl white

My pearl white mixture:
1 part Vallejo pearl medium
1 part titanium white
2 parts pouring medium
All my paints are mixed with Boesner Guardi acrylic binder and acrylic emulsion.
f you are interested in ONLINE PRIVATE CLASSES, you can contact me via Facebook Fiona Art or email zemljicr@gmail.com.

3.jpg

Please understand that I am in no way responsible for the way you use your paint and mediums. Follow all safety instructions of the manufacturers, I can not be held liable.
Be careful and use the proper materials for your safety.

You can't use any content on my channel, unless I give you a permission!
 
CUP BOTTOM reverse flower dip ~ SPIN ART ~ Acrylic pour painting ~ Paint #WithMe


I want to share this Cup bottom reverse flower dip that I spun out and now I'm sorry.
Haha, just to remind all of us, that sometimes you have to step back of the painting and take a deep breath before you decide to mess with it some more. :D

PROCESS:
- Pour your base on canvas
- Put your FLOWER SHAPED DESERT CUP on the canvas with bottom up
- Pour paints on the bottom and use PEARL WHITE or some metallic paints between each colour to create petal - lacing effect
- Take off the cup
- Use SKEWER to draw some petal shapes
- Gently put PAPER NAPKIN or towel on canvas ( You can use dry or damped napkin)
- Lift one corner at the time and then gently lift it (the middle last)
- Torch it for air bubbles and to activate pearl white and metallic paints
- And here is your flower :)

TECHNIQUE: Reverse flower dip with paper napkin, Cup bottom pour

1.JPG

MATERIAL I USED:
- 8x8 inch canvas
- Acrylic paints mixed with pouring medium
- Flower shaped desert cup
- Paper napkin or towel
- Wooden skewer
- Palete knife
- Torch

My pearl white mixture:
1 part Vallejo pearl medium
1 part titanium white
2 parts pouring medium
All my paints are mixed with Boesner Guardi acrylic binder and acrylic emulsion.
If you are interested in ONLINE PRIVATE CLASSES, you can contact me via Facebook Fiona Art or email zemljicr@gmail.com.
Please understand that I am in no way responsible for the way you use your paint and mediums. Follow all safety instructions of the manufacturers, I can not be held liable.
Be careful and use the proper materials for your safety.

You can't use any content on my channel, unless I give you a permission!
 
STUNNING lacing with GLUE ~ 100K GIVEAWAY announcement ~ Acrylic pour panting ~ MUST SEE!


You must see this STUNNING acrylic pour FLOWER painting!!! This time I used glue and water mixture as my pouring medium, because I have a lot left from private lesson with Tish.
I'm really in love with this awesome lacing with this mixture and so glad, that it dried perfect... Can't wait to varnish it and she will shine even more. :)
PROCESS:
- Pour your base on canvas
- Put your BOTTLE BOTTOM on the canvas with bottom up
- Pour paints on the bottom and use some METALLIC paints between each colour to create petal - lacing effect
- Take off the bottle bottom
- Use SKEWER to draw some petal shapes
- Gently put PAPER NAPKIN or towel on canvas ( You can use dry or damped napkin)
- Lift one corner at the time and then gently lift it (the middle last)
- Torch it for air bubbles and to activate pearl white and metallic paints
- And here is your flower :)
TECHNIQUE: Reverse flower dip with paper napkin, Bottle bottom pour
1yt383.JPG
MATERIAL I USED:
- 10x10 inch canvas
- Acrylic paints mixed with pouring medium
- Flower shaped desert cup
- Paper napkin or towel
- Wooden skewer
- Palete knife
- Torch
COLOURS I USED:
- Boesner black for the base coat
- Arties colours magenta
- Amsterdam permanent blue violet
- Amsterdam titanium white
- Extreme sheen safire
- Extreme sheen gold
My pouring medium today is 60% Craft PVA glue and 40% water.
I mixed 1 part paint to 1 part pouring medium and a little bit of water to some paints to get the same consistency.
If you are interested in ONLINE PRIVATE CLASSES, you can contact me via Facebook Fiona Art or email zemljicr@gmail.com.
Please understand that I am in no way responsible for the way you use your paint and mediums. Follow all safety instructions of the manufacturers, I can not be held liable.
Be careful and use the proper materials for your safety.
You can't use any content on my channel, unless I give you a permission!
 
Only PAINT and WATER! ~ CUP BOTTOM reverse flower dip ~ Acrylic pour painting
I did an experiment and used only PAINT and WATER for this CUP BOTTOM reverse flower dip acrylic pour painting.
I got some lacing and cute cells, but I will need to play a little more with the consistency, but still it looks kind of neat.

Tell me in the comments, if you want me to try to do it with some Extreme Sheen paints to see, what effects they create.
PROCESS:
- Pour your base on canvas
- Put your FLOWER SHAPED DESERT CUP on the canvas with bottom up
- Pour paints on the bottom and use PEARL WHITE or some metallic paints between each colour to create petal - lacing effect
- Take off the cup
- Use SKEWER to draw some petal shapes
- Gently put PAPER NAPKIN or towel on canvas ( You can use dry or damped napkin)
- Lift one corner at the time and then gently lift it (the middle last)
- Torch it for air bubbles and to activate pearl white and metallic paints
- And here is your flower :)

TECHNIQUE: Reverse flower dip with paper napkin, Cup bottom pour

MATERIAL I USED:
- 8x8 inch canvas
- Acrylic paints mixed with water
- Flower shaped desert cup
- Paper napkin or towel
- Wooden skewer
- Palete knife
- Torch

COLOURS I USED:
- Boesner black for the base coat
- Arties colours cerulean blue
- Maimeri Bordeaux
- Vallejo naples yellow hue
- Pearl white

My pearl white mixture:
1 part Vallejo pearl medium
1 part titanium white
And water to consistency
If you are interested in ONLINE PRIVATE CLASSES, you can contact me via Facebook Fiona Art or email zemljicr@gmail.com.
Please understand that I am in no way responsible for the way you use your paint and mediums. Follow all safety instructions of the manufacturers, I can not be held liable.
Be careful and use the proper materials for your safety.

You can't use any content on my channel, unless I give you a permission!
 
AWESOME acrylic pour FLOWER painting ~ Peacock colours ~ MUST SEE!!! ~ Paint #WithMe

You must see this AWESOME acrylic pour FLOWER painting!!! I used peacock colours and it turned out just gorgeous.
But... :D
I still have some room to improve it, so I will definitely try this colour combo once more. ;)

TECHNIQUE: Reverse flower dip with paper napkin, Cup bottom pour


COLOURS I USED:
- Boesner black for the base coat
- Arties colours emerald
- Extreme sheen aqamarine
- Amsterdam yellowish green
- Pebeo iridescent precious gold
- Pearl white
- Amsterdam green turquise
- Arties colours cobalt blue
- Arties colours dioxazine purple

PROCESS:
- Pour your base on canvas
- Put your FLOWER SHAPED DESERT CUP on the canvas with bottom up
- Pour paints on the bottom and use PEARL WHITE or some metallic paints between each colour to create petal - lacing effect
- Take off the cup
- Use SKEWER to draw some petal shapes
- Gently put PAPER NAPKIN or towel on canvas ( You can use dry or damped napkin)
- Lift one corner at the time and then gently lift it (the middle last)
- Torch it for air bubbles and to activate pearl white and metallic paints
- And here is your flower :)

MATERIAL I USED:
- 10x10 inch canvas
- Acrylic paints mixed with pouring medium
- Flower shaped desert cup
- Paper napkin or towel
- Wooden skewer
- Palete knife
- Torch

My pearl white mixture:
1 part Vallejo pearl medium
1 part titanium white
2 parts pouring medium

1yt485.JPG

All my paints are mixed with Boesner Guardi acrylic binder and acrylic emulsion.
If you are interested in ONLINE PRIVATE CLASSES, you can contact me via Facebook Fiona Art or email zemljicr@gmail.com.

Please understand that I am in no way responsible for the way you use your paint and mediums. Follow all safety instructions of the manufacturers, I can not be held liable.
Be careful and use the proper materials for your safety.

You can't use any content on my channel, unless I give you a permission!
 
BLACK & WHITE ~ CUP BOTTOM acrylic pour FLOWER painting ~ MUST SEE!!! ~ Paint #WithMe
You must see this AMAZING CUP BOTTOM acrylic pour FLOWER painting!!!
I used just two colours BLACK & WHITE and this 3D look with all this lacing is just stunning.

TECHNIQUE: Reverse flower dip with paper napkin, Cup bottom pour
PROCESS:
- Pour your base on canvas
- Put your FLOWER SHAPED DESERT CUP on the canvas with bottom up
- Pour paints on the bottom and use PEARL WHITE or some metallic paints between each colour to create petal - lacing effect
- Take off the cup
- Use SKEWER to draw some petal shapes
- Gently put PAPER NAPKIN or towel on canvas ( You can use dry or damped napkin)
- Lift one corner at the time and then gently lift it (the middle last)
- Torch it for air bubbles and to activate pearl white and metallic paints
- And here is your flower :)

MATERIAL I USED:
- 10x10 inch canvas
- Acrylic paints mixed with pouring medium
- Flower shaped desert cup
- Paper napkin or towel
- Wooden skewer
- Palete knife
- Torch

COLOURS I USED:
- Boesner black
- Pearl white

My pearl white mixture:
1 part Vallejo pearl medium
1 part titanium white
2 parts pouring medium
2yt386.JPG
All my paints are mixed with Boesner Guardi acrylic binder and acrylic emulsion.
If you are interested in ONLINE PRIVATE CLASSES, you can contact me via Facebook Fiona Art or email zemljicr@gmail.com.
Please understand that I am in no way responsible for the way you use your paint and mediums. Follow all safety instructions of the manufacturers, I can not be held liable.
Be careful and use the proper materials for your safety.

You can't use any content on my channel, unless I give you a permission!
 
Back
Top