KillaDays
I've Got It
DISCLAIMER: This won't completely get rid of the plosives, just diminish the harshness with minimal audio distortion. I found this to be the best fix as most other fixes can give you quite a bit of distortion, making it sound even worse.
I thought I would make this tutorial for anyone else that uses audacity to edit their audio when there is a problem with the audio. This tutorial is focused on getting rid of harsh sounding 'p' and 'b' sounds. All you need is your audio recording and audacity. Here's an example of some pretty shoddy audio that needs to be fixed:
(This is just so you can get an idea of what the plosives sound like)
Keep in mind that these noises are also easily preventable! You can prevent them by getting a popscreen, a windscreen, and angle the mic further away from your face (you might notice the mic is angled right at my mouth, I shouldn't have done that as it made the audio quite a bit harsher.). I made a DIY pop-screen out of a wire coat hanger and dollar store leggings. I wouldn't recommend buying one as they are usually quite a bit of money and aren't worth the price when they are so easy to make.
This tutorial is for people that realize the audio wasn't very good until after they recorded it (like me) but still want to use the footage.
So, on to the tutorial:
You are going to want to open up audacity with your project.

From there you are going to want to click on the "Effect" tab shown at the very top of the screen.

From Effect, you want to go to Equalizer:

When you open it, it should be flat, or it should look like this:

If it doesn't look like that, simply press the Flatten button as highlighted blue in the above picture.
Now, this is where you are going to begin to make the fix for the sound. Starting at 160 Hz, you want to gradually slide the sliders down so it makes a gentle curve until the last four sliders (40Hz-20Hz). The last four sliders you want to leave them at the very bottom of the sliders. So, in all, it should look like this when you are done:

Next, you are going to want to save this. You are going to click "Save/Manage Curves". This screen will pop up:

Click Rename, name it what you want and then click 'ok'. As you can see, above the 'unnamed' equalizer, is the custom 'P' Fix. That's my plosive fix and it's basically what I showed you in the last image.
Now after this point, it's an easy ride from here on out.
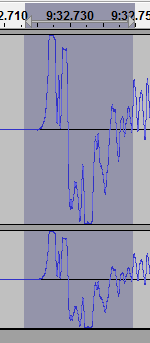
Plosives, or the harsh 'b' and 'p' sounds have a certain look about them. After the first few fixes you should be able to spot them easily. They look similar to this:
As you can see, I have it selected. Use the select tool and select the plosives, then go up to effects, click equalizer, MAKE SURE it's on the one that you just made (with the curve, in my case, "P Fix") and then click OK. After using the equalizer it will look like this:
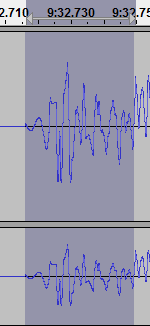
Quite a drastic difference. Now you just rinse and repeat for the rest of the audio track, selecting the plosive problem areas and then you can click CTRL+R to quickly shortcut to what you just did.
I hope this helps anyone who is having troubles with harsh sounds in their audio. If you have any questions feel free to ask and I will help to the best of my ability")
I thought I would make this tutorial for anyone else that uses audacity to edit their audio when there is a problem with the audio. This tutorial is focused on getting rid of harsh sounding 'p' and 'b' sounds. All you need is your audio recording and audacity. Here's an example of some pretty shoddy audio that needs to be fixed:
Keep in mind that these noises are also easily preventable! You can prevent them by getting a popscreen, a windscreen, and angle the mic further away from your face (you might notice the mic is angled right at my mouth, I shouldn't have done that as it made the audio quite a bit harsher.). I made a DIY pop-screen out of a wire coat hanger and dollar store leggings. I wouldn't recommend buying one as they are usually quite a bit of money and aren't worth the price when they are so easy to make.
This tutorial is for people that realize the audio wasn't very good until after they recorded it (like me) but still want to use the footage.
So, on to the tutorial:
You are going to want to open up audacity with your project.
From there you are going to want to click on the "Effect" tab shown at the very top of the screen.
From Effect, you want to go to Equalizer:
When you open it, it should be flat, or it should look like this:
If it doesn't look like that, simply press the Flatten button as highlighted blue in the above picture.
Now, this is where you are going to begin to make the fix for the sound. Starting at 160 Hz, you want to gradually slide the sliders down so it makes a gentle curve until the last four sliders (40Hz-20Hz). The last four sliders you want to leave them at the very bottom of the sliders. So, in all, it should look like this when you are done:
Next, you are going to want to save this. You are going to click "Save/Manage Curves". This screen will pop up:
Click Rename, name it what you want and then click 'ok'. As you can see, above the 'unnamed' equalizer, is the custom 'P' Fix. That's my plosive fix and it's basically what I showed you in the last image.
Now after this point, it's an easy ride from here on out.
Plosives, or the harsh 'b' and 'p' sounds have a certain look about them. After the first few fixes you should be able to spot them easily. They look similar to this:
As you can see, I have it selected. Use the select tool and select the plosives, then go up to effects, click equalizer, MAKE SURE it's on the one that you just made (with the curve, in my case, "P Fix") and then click OK. After using the equalizer it will look like this:
Quite a drastic difference. Now you just rinse and repeat for the rest of the audio track, selecting the plosive problem areas and then you can click CTRL+R to quickly shortcut to what you just did.
I hope this helps anyone who is having troubles with harsh sounds in their audio. If you have any questions feel free to ask and I will help to the best of my ability
