- Joined
- Aug 31, 2011
- Messages
- 22,357
- Reaction score
- 16,030
- Channel Type
- Youtuber
This short article will show you step by step in pictures how to watermark your video in Sony Vegas Pro 10. I am including all details so beginners and more experienced people understand easily.
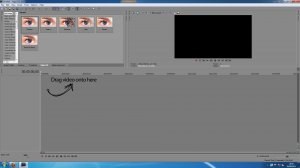
Okay open up Sony Vegas and you will have this like so:
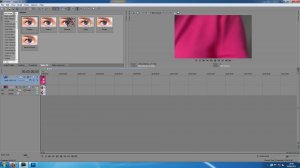
Drag your video file onto the timeline like so:
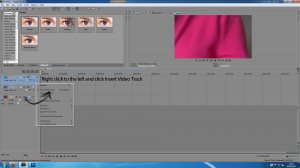
Now you have your video clip I will assume you have finished editing it and such right click to the left as shown in the image below and click on Insert Video Track, this will make a new video track on the timeline above your current tracks.
Now open up Photoshop or any other program you can save transparent background PNG files in and make your watermark, think about size and resolution too, for mine I will be using 468px x 60px for this tutorial and you can download it below and also the PSD for it at the bottom.


Okay we now have our watermark and video ready to watermark. With your watermark on your desktop, drag and drop it into the new video track and position it on the timeline as needed, make sure to lengthen it by dragging its edge to the right along the length of the track below it like so:
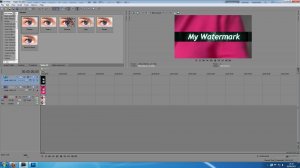
Now you have it on the timeline we need to adjust its size and also its position on the video. Click the Pan/Crop icon which is on the clip in the timeline for our watermark image and drag the top dotted line outwards as if to expand (it makes it smaller though) until it looks about the right size you need.
Please see these images for this bit:

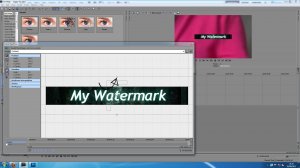
When it is the right size click the small X to close the Pan/Crop window and now head on over to the track motion icon and click on it like so:
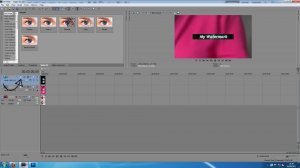
And now click the small circle in the middle like so and move it around until you have it where you want it you can optionally adjust the X and Y axis in the options on the left entering specific values, it might also be a good idea to note the values down once you have it in the right place in case you ever lose your finished saved file at the end.

Now it is in the right place click the small X at the upper right hand corner of the track motion window to close it.
We now need to adjust the watermark's opacity, this is optional but for most video watermarks you will want to do this. Click and drag the slider shown in the image below until the opacity (the watermark tracks transparency) is lowered to a good level, around 30-50% is good enough for most videos but go for whatever looks best to you and for your video content.

Now that is your watermark done! You can now go ahead and render your video and enjoy knowing your videos are more protected against video thieves and also is more branded with your name helping people to remember you or your product etc
Thanks for reading and I will be adding a video tutorial version soon enough")
Hope this helps!
Here is the video version:
Okay open up Sony Vegas and you will have this like so:
Drag your video file onto the timeline like so:
Now you have your video clip I will assume you have finished editing it and such right click to the left as shown in the image below and click on Insert Video Track, this will make a new video track on the timeline above your current tracks.
Now open up Photoshop or any other program you can save transparent background PNG files in and make your watermark, think about size and resolution too, for mine I will be using 468px x 60px for this tutorial and you can download it below and also the PSD for it at the bottom.
Okay we now have our watermark and video ready to watermark. With your watermark on your desktop, drag and drop it into the new video track and position it on the timeline as needed, make sure to lengthen it by dragging its edge to the right along the length of the track below it like so:
Now you have it on the timeline we need to adjust its size and also its position on the video. Click the Pan/Crop icon which is on the clip in the timeline for our watermark image and drag the top dotted line outwards as if to expand (it makes it smaller though) until it looks about the right size you need.
Please see these images for this bit:
When it is the right size click the small X to close the Pan/Crop window and now head on over to the track motion icon and click on it like so:
And now click the small circle in the middle like so and move it around until you have it where you want it you can optionally adjust the X and Y axis in the options on the left entering specific values, it might also be a good idea to note the values down once you have it in the right place in case you ever lose your finished saved file at the end.
Now it is in the right place click the small X at the upper right hand corner of the track motion window to close it.
We now need to adjust the watermark's opacity, this is optional but for most video watermarks you will want to do this. Click and drag the slider shown in the image below until the opacity (the watermark tracks transparency) is lowered to a good level, around 30-50% is good enough for most videos but go for whatever looks best to you and for your video content.
Now that is your watermark done! You can now go ahead and render your video and enjoy knowing your videos are more protected against video thieves and also is more branded with your name helping people to remember you or your product etc
Thanks for reading and I will be adding a video tutorial version soon enough
Hope this helps!
Here is the video version:
Attachments
-
227.6 KB Views: 2
