- Joined
- Aug 31, 2011
- Messages
- 22,357
- Reaction score
- 16,030
- Channel Type
- Youtuber
This tutorial will help you make your very first YouTube background in Photoshop. This tutorial is intended for absolute newcomers to Adobe Photoshop and assumes little to no knowledge.
If you dont have Photoshop you can get a Photoshop trial which will last a month, this is where you can get a Photoshop trial:
http://www.adobe.com/cfusion/tdrc/index.cfm?product=photoshop
Once downloaded install it and run the program.
Okay, so you now have Photoshop open in front of you, the amount of tools and options may seem daunting at first but the more you use it and play with it the more you will get used to things.
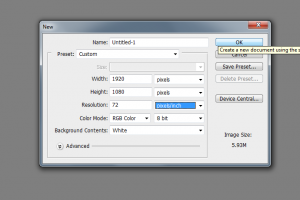
Firstly click File > New. Now change the Preset option to custom and change the values like so:
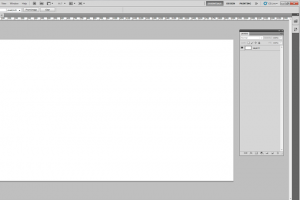
You will now have a blank white document or canvas. This is where the magic happens
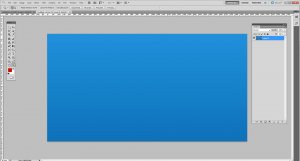
On the right you should see the Layers palette, the Layers palette is something you will always use with your work in Photoshop, it allows you to bring Layers to the foreground of the image, group layers together and so much more. Right now though we will concentrate on getting this background done. In the Layers palette you will see that there is already one there called background, double click this layer to unlock it, all new documents start off with a locked background layer and unlocking it will more than likely become a habit for you. You know that it is unlocked when the small padlock icon disappears.
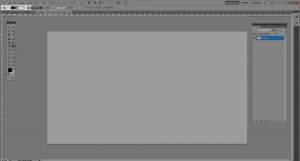
So you now should have something that looks like this (please note I have resized it and cropped it a bit):
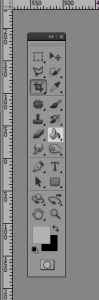
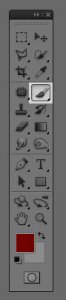
On the left you will see the Tools palette, the tools palette is where you find a lot of quick editing tools such as the crop tool, marquee tool, paint bucket tool and gradient tool. Today we are using the gradient tool. Have a look at the image below, see the paint bucket where I have highlighted? Click and hold your mouse on that icon and select the gradient tool.
Okay now we are almost ready to use the tool, now we need to choose our gradient colours, by the way a gradient is two or more colours that are used to blend/fade into one another to create a nice looking effect, for example the colours could be a solid black to a slightly lighter black at the top or it could be a dark reddy pink to a bright pink. You will see what I mean in a moment
Okay now at the top of Photoshop you will see this:
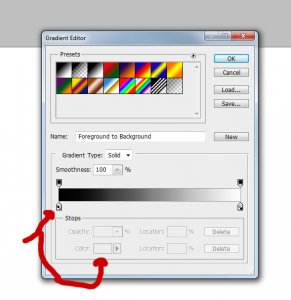
Click the black to white bar to bring up the gradient editor, the gradient editor is where we will choose our colours and for this background tutorial we are going for some nice blues. Feel free to change these to your own preference and experiment.
Now click on where I have the first arrow pointing to which is the first colour stop, this will allow you to change the colour, click where the second arrow points to and change the colour to a nice dark blue, you can paste this hex colour value into the small box at the bottom right to have the exact same colour as myself:
0077bb

Click okay and you will the first colour chosen, now go over to the right and repeat the step above but this time change the colour to a brighter blue, slightly brighter of course and for this second colour I am using this colour:
1d9be3
When done click okay until you have got rid of the gradient editor.
Now move your mouse over the canvas (blank document), move it towards the bottom where the edge of the document is, hold down shift on your keyboard and click and drag upwards towards the top of the document, this will produce this or something similar, keep trying over and over until you get it just right.
Now thats our background gradient done, we can now move onto dabbling with the brush tool. Come over to where the tools palette is and select the tool shown in the image below, this is the brush tool:
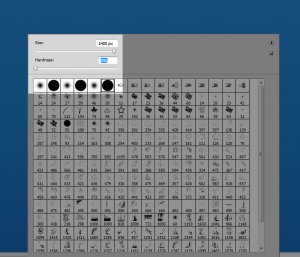
Once selected move your mouse over the canvas and right click, this will bring up the brush tool settings, adjust them so they match the image below and we can be on our way:
Thats your brush set up, now we need to quickly grab a colour from the tools palette like so:

The colour I am using is:
28c8f6
Simply paste that into the box which pops up when you click the colour picker. Make sure it is the same icon as in my picture as the one in front of the other is the foreground colour and the white one is the background colour.
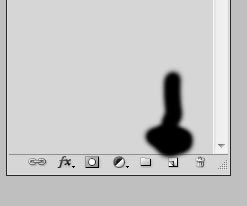
Now come over to the Layers pallette and click this icon to make a new layer:
Now hover the large brush over the canvas and in the middle of the canvas click once, this will create the nice blue on top. Tip: You can zoom out by pressing Z on your keyboard, holding down the alt key next and clicking on the canvas.
This is most of our background done now, we wont bother with making the centre of it, the new YouTube layout means we dont really need it. What you can do now is brand it with your own pictures, to do this simply drag and drop them onto the background and use control and T to free transform (resize them). This could be your own logo, just play with things and you will learn some more")
Here is what I came up with after adding some imagery (click for full size):

I have attached the PSD file for this background and also our YTtalk YouTube background template if you want to get straight in there and start designing your own.
If you want rounded corners on yours check out TheDutch1K's youtube template PSD file here:
http://yttalk.com/threads/youtube-background-template-psd.932/
For more designing tips or to ask about what others think of your own custom YouTube background/icons post them up here for us to see:
http://yttalk.com/forums/branding-and-channel-design.18/
I will have a basic icon making guide coming very soon for absolute beginners so make sure to watch out for it.
If you dont have Photoshop you can get a Photoshop trial which will last a month, this is where you can get a Photoshop trial:
http://www.adobe.com/cfusion/tdrc/index.cfm?product=photoshop
Once downloaded install it and run the program.
Okay, so you now have Photoshop open in front of you, the amount of tools and options may seem daunting at first but the more you use it and play with it the more you will get used to things.
Firstly click File > New. Now change the Preset option to custom and change the values like so:
You will now have a blank white document or canvas. This is where the magic happens
On the right you should see the Layers palette, the Layers palette is something you will always use with your work in Photoshop, it allows you to bring Layers to the foreground of the image, group layers together and so much more. Right now though we will concentrate on getting this background done. In the Layers palette you will see that there is already one there called background, double click this layer to unlock it, all new documents start off with a locked background layer and unlocking it will more than likely become a habit for you. You know that it is unlocked when the small padlock icon disappears.
So you now should have something that looks like this (please note I have resized it and cropped it a bit):
On the left you will see the Tools palette, the tools palette is where you find a lot of quick editing tools such as the crop tool, marquee tool, paint bucket tool and gradient tool. Today we are using the gradient tool. Have a look at the image below, see the paint bucket where I have highlighted? Click and hold your mouse on that icon and select the gradient tool.
Okay now we are almost ready to use the tool, now we need to choose our gradient colours, by the way a gradient is two or more colours that are used to blend/fade into one another to create a nice looking effect, for example the colours could be a solid black to a slightly lighter black at the top or it could be a dark reddy pink to a bright pink. You will see what I mean in a moment
Okay now at the top of Photoshop you will see this:
Click the black to white bar to bring up the gradient editor, the gradient editor is where we will choose our colours and for this background tutorial we are going for some nice blues. Feel free to change these to your own preference and experiment.
Now click on where I have the first arrow pointing to which is the first colour stop, this will allow you to change the colour, click where the second arrow points to and change the colour to a nice dark blue, you can paste this hex colour value into the small box at the bottom right to have the exact same colour as myself:
0077bb
Click okay and you will the first colour chosen, now go over to the right and repeat the step above but this time change the colour to a brighter blue, slightly brighter of course and for this second colour I am using this colour:
1d9be3
When done click okay until you have got rid of the gradient editor.
Now move your mouse over the canvas (blank document), move it towards the bottom where the edge of the document is, hold down shift on your keyboard and click and drag upwards towards the top of the document, this will produce this or something similar, keep trying over and over until you get it just right.
Now thats our background gradient done, we can now move onto dabbling with the brush tool. Come over to where the tools palette is and select the tool shown in the image below, this is the brush tool:
Once selected move your mouse over the canvas and right click, this will bring up the brush tool settings, adjust them so they match the image below and we can be on our way:
Thats your brush set up, now we need to quickly grab a colour from the tools palette like so:
The colour I am using is:
28c8f6
Simply paste that into the box which pops up when you click the colour picker. Make sure it is the same icon as in my picture as the one in front of the other is the foreground colour and the white one is the background colour.
Now come over to the Layers pallette and click this icon to make a new layer:
Now hover the large brush over the canvas and in the middle of the canvas click once, this will create the nice blue on top. Tip: You can zoom out by pressing Z on your keyboard, holding down the alt key next and clicking on the canvas.
This is most of our background done now, we wont bother with making the centre of it, the new YouTube layout means we dont really need it. What you can do now is brand it with your own pictures, to do this simply drag and drop them onto the background and use control and T to free transform (resize them). This could be your own logo, just play with things and you will learn some more
Here is what I came up with after adding some imagery (click for full size):
I have attached the PSD file for this background and also our YTtalk YouTube background template if you want to get straight in there and start designing your own.
If you want rounded corners on yours check out TheDutch1K's youtube template PSD file here:
http://yttalk.com/threads/youtube-background-template-psd.932/
For more designing tips or to ask about what others think of your own custom YouTube background/icons post them up here for us to see:
http://yttalk.com/forums/branding-and-channel-design.18/
I will have a basic icon making guide coming very soon for absolute beginners so make sure to watch out for it.
Attachments
-
 49.2 KB Views: 6
 -
219.7 KB Views: 4