- Joined
- Aug 31, 2011
- Messages
- 22,357
- Reaction score
- 16,030
- Channel Type
- Youtuber
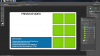
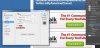
In this guide I will show you from start to finish how to create one of these, an outro end card and share some of my tips for making ones that work well.
This is our newest end card for our videos at YTtalkTV, following this guide you will be able to make the one just below ours:


To begin with you will need an image editing software such as Adobe Photoshop or GIMP, I am using Photoshop and dont have much experience with GIMP unfortunately so I wont be able to help you. Once you have one of those installed on your computer we can begin by opening a new canvas, first consider the output resolution of your videos, I usually render in 1080p (1920x1080px) and therefore I will want to make the end card the same size in Photoshop.
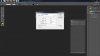
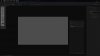
Make your new canvas by clicking File>New> Entering the size in pixels and then hit ok.
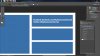
Now we have our blank canvas. Our plan is to have a single box for one video and a few more boxes for images/advertisements for our collaborators channels. Come down to the tools palette and select the rectangle shape tool and choose a nice blue as the foreground colour:
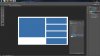
Once you have that done come over to your canvas a draw a rectangle on the left side of it leaving space at the top and left of the box and on the right for four more boxes. Now we have our blue video box we are going to create our four advertising boxes on the right side, simply click and drag the rectangle tool to create four more, you can right click the layer and duplicate them to make things easier if you know how, we will go with four like so:
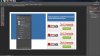
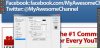
In the top most rectangle on the right we are going to add some of our social media information, we have Facebook and Twitter to add there, come over to the text tool and click onto the canvas and type out your social media information like so:
If you need to position the text make sure to use the Move tool as pictured below to move the text and align it correctly within the box:

Feel free to add others that you have such as Google Plus, Pinterest, Instagram and all your other favourites that you are active on.
Now we have our social media page links out of the way we will add our first advertisement banner, for the purposes of this tutorial I will be using a YTtalk advert banner, feel free to use it yourself if you fancy helping out the site. Not everyone will want to have banners in their end card/outro so feel free to add any other content there, you may work with other channels, you could ask them for a banner the same size as the one below to advertise their channel at the end of your videos, at present we are doing such an exchange with WeAreYTube over at YTtalk to help cross promote the two channels.

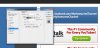
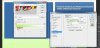
To add some style to the top social media links box I am going to adjust the blending options for the layer using the following settings, you can adjust them to your own liking and even adjust the background layer colour at this stage as I know many of you prefer a coloured background. To change the blending options right click the rectangle layer and click Blending Options:
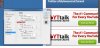
And now we have that done, we will add some styling to the social media box text layers with the following blending options:
And lets apply some blending options to the background of the end card, a nice lime green:
You can make your own adjustments from here on with the content for your outro end card, be creative and see what you can come up with. A great tip is not to include the left side box as it will allow more leeway when you adding the video on top in your video editor and make editing easier for you. I recommend having call to actions within your outro to prompt those viewing to take action, whether thats clicking a subscribe button, checking out someone elses channel via an annotation or heading on over to your Facebook page to like it, make sure to include some CTA's and encourage people to click them. It is a fantastic opportunity to create more traffic to your other videos and allow the view to engage with your content. Keep things simple, short and clean and I am sure it will help you.
Once you are happy with your outro/end card go to File> Save for web and save it as a PNG 24 leaving all options as default.
If you want to use a Subscribe button exactly like ours in the first end card image you can download the ones I released for free here:
http://yttalk.com/threads/youtube-subscribe-button-psd-and-pngs.106248/
I have attached the PSD file for this end card to the bottom of this post if you would like to edit mine really quickly, it is royalty free and free for you to use for commercial purposes so 100% free to use, feel free to keep or remove the YTtalk banner too.
I will be releasing a pack of end card templates for Photoshop very soon as a resource within this forum so keep an eye out for them, they will also be 100% free to use, modify and use in your monetised videos without worry.
Thanks for reading and I hope you have fun making your end cards, if you have any questions or tips to share feel free to ask away or post them up.
This is our newest end card for our videos at YTtalkTV, following this guide you will be able to make the one just below ours:
To begin with you will need an image editing software such as Adobe Photoshop or GIMP, I am using Photoshop and dont have much experience with GIMP unfortunately so I wont be able to help you. Once you have one of those installed on your computer we can begin by opening a new canvas, first consider the output resolution of your videos, I usually render in 1080p (1920x1080px) and therefore I will want to make the end card the same size in Photoshop.
Make your new canvas by clicking File>New> Entering the size in pixels and then hit ok.
Now we have our blank canvas. Our plan is to have a single box for one video and a few more boxes for images/advertisements for our collaborators channels. Come down to the tools palette and select the rectangle shape tool and choose a nice blue as the foreground colour:
Once you have that done come over to your canvas a draw a rectangle on the left side of it leaving space at the top and left of the box and on the right for four more boxes. Now we have our blue video box we are going to create our four advertising boxes on the right side, simply click and drag the rectangle tool to create four more, you can right click the layer and duplicate them to make things easier if you know how, we will go with four like so:
In the top most rectangle on the right we are going to add some of our social media information, we have Facebook and Twitter to add there, come over to the text tool and click onto the canvas and type out your social media information like so:
If you need to position the text make sure to use the Move tool as pictured below to move the text and align it correctly within the box:
Feel free to add others that you have such as Google Plus, Pinterest, Instagram and all your other favourites that you are active on.
Now we have our social media page links out of the way we will add our first advertisement banner, for the purposes of this tutorial I will be using a YTtalk advert banner, feel free to use it yourself if you fancy helping out the site. Not everyone will want to have banners in their end card/outro so feel free to add any other content there, you may work with other channels, you could ask them for a banner the same size as the one below to advertise their channel at the end of your videos, at present we are doing such an exchange with WeAreYTube over at YTtalk to help cross promote the two channels.
To add some style to the top social media links box I am going to adjust the blending options for the layer using the following settings, you can adjust them to your own liking and even adjust the background layer colour at this stage as I know many of you prefer a coloured background. To change the blending options right click the rectangle layer and click Blending Options:
And now we have that done, we will add some styling to the social media box text layers with the following blending options:
And lets apply some blending options to the background of the end card, a nice lime green:
You can make your own adjustments from here on with the content for your outro end card, be creative and see what you can come up with. A great tip is not to include the left side box as it will allow more leeway when you adding the video on top in your video editor and make editing easier for you. I recommend having call to actions within your outro to prompt those viewing to take action, whether thats clicking a subscribe button, checking out someone elses channel via an annotation or heading on over to your Facebook page to like it, make sure to include some CTA's and encourage people to click them. It is a fantastic opportunity to create more traffic to your other videos and allow the view to engage with your content. Keep things simple, short and clean and I am sure it will help you.
Once you are happy with your outro/end card go to File> Save for web and save it as a PNG 24 leaving all options as default.
If you want to use a Subscribe button exactly like ours in the first end card image you can download the ones I released for free here:
http://yttalk.com/threads/youtube-subscribe-button-psd-and-pngs.106248/
I have attached the PSD file for this end card to the bottom of this post if you would like to edit mine really quickly, it is royalty free and free for you to use for commercial purposes so 100% free to use, feel free to keep or remove the YTtalk banner too.
I will be releasing a pack of end card templates for Photoshop very soon as a resource within this forum so keep an eye out for them, they will also be 100% free to use, modify and use in your monetised videos without worry.
Thanks for reading and I hope you have fun making your end cards, if you have any questions or tips to share feel free to ask away or post them up.
Attachments
-
611.7 KB Views: 63

 why is your windows bar thingy on top


 .
.")