- Joined
- Aug 31, 2011
- Messages
- 22,357
- Reaction score
- 16,030
- Channel Type
- Youtuber
What Annotations Are And Their Uses
First of all let me explain what annotations are, annotations are a feature on YouTube that allows you to place an overlay on your video and add text to it or link it. They are commonly used as call to actions and as a way of getting the viewer to interact with your videos.
You will see these in many videos across YouTube and they add an interactive element to your videos. Annotations give you the power to create clear call to actions within your videos, for example if you verbally remind viewers towards the end of your video to subscribe you can place a note annotation linking to subscribe to your channel to make it a whole lot easier for them to subscribe. It is all about making things easier for the viewer to engage and interact with your content by guiding them with notes and links and hopefully converting their clicks into an action such as subscribing, viewing more of your videos and so on.
So how do you add annotations to your videos you might wonder? Adding them is simple mostly although it can become a tedious task after you have recorded, edited, uploaded and then SEO’d your video, not another step is what so many people think but it is certainly worth it if you want your video to have the best chances at performing well on YouTube and to give your viewers a chance to engage with your content.
Types of Annotations
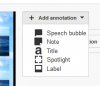
So lets look at the few types of annotations that are available to us and what each annotation does and looks like on a video, we have:
Speech Bubble - Speech bubbles are exactly what they say they are, they look like a speech bubble, you can add text to them and adjust the bottom triangle to position it correctly when using it.

Note - This is one of the most commonly used annotations, the note provides a space for text, can be adjusted in size, can be linked and have its background colour changed.

Title - The title annotation is great if you want to add a title to your video at the start, this one is not used as often as some of the others.

Spotlight - The spotlight is my personal favourite, allowing you to highlight a portion of the video and link it, this is perfect for linking in video graphics to other videos, channels and so much more, you are only limited by your creativity when using the spotlight annotation.

Label - Labels are less common but are very useful when you want to label parts of your video for example if you had several pictures that were shown, you might wish to label them using the label annotation. The label looks like a spotlight annotation until hovered which reveal the text label.
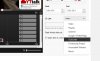
A Look At The Annotation Editor
So lets take a look at the annotations editor in a bit more depth so we know what each part of it does and how it works before actually using it, feel free to dive right in and play around with the features as many people prefer to learn by doing it for themselves like myself:

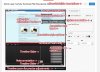
From top to bottom we have the following features and their uses:
Save & Publish Annotations - This is used once your annotations are complete or you can use Save to save them for later but not publish them. Once published they are displayed publicly on your video.
Add New Annotation - The Add Annotation button is where you will be begin to add annotations, clicking it reveals the annotation types such as note, spotlight and label.
Annotation Jump Selector - This allows you to jump and select the various annotations in your video easily and quickly, I don't use this feature much at all to be honest but its there for when you need it.
Adjustable Annotation Preview - When in the annotation editor you see previews of your annotations and can enlarge or shrink them by dragging the corners and reposition them by clicking and dragging them to a new spot.
Delete Annotation - It’s a trash can and we put rubbish in those, the same applies here, if you want rid of an annotation, click and select the annotation then delete it using this button.
Annotation Text Input - This field allows you to fill in the text you wish to add to your annotation.
Annotation Style Options - These change depending on the chosen annotation type and include font size, background colours and text colours.
Annotation Start/End - This shows you exactly when the annotation starts and when the annotation ends.
Annotation Link Options - Check this box to pull up more options for linking your annotations.
Timeline Slider - This slider when clicked and dragged allows you to move along the timeline, similar to in your video editing software.
Note Annotation - The annotation placed on the timeline is a note annotation, it is currently selected and these are adjustable by clicking and dragging the left or right sides to lengthen the duration which is shows for.
Timeline Slider - See above for more information.
Timeline Zoom For Precise Adjustments - You can use this tool to zoom into the timeline and make fine adjustments to your annotation length.
How to Add Annotations to Your Videos
Depending on how you are using them you will need to decide which ones you are going to use and whether they are suitable for what you wish to achieve. For example a Note annotation will cover up a part of your video where you might want the annotation to be transparent which would mean the spotlight annotation would be a better choice. You might want to have an image in your video link to another video or channel, the possibilities are endless.
Adding a Note Annotation and Linking it
Lets add a note annotation to our video, make some adjustments and then link it so that when the viewer clicks it, it takes them to our channel to subscribe.
1. In your video manager on youtube here: https://www.youtube.com/my_videos
2. Find the video you want to add annotations to.
3. Where the edit button is you will notice an arrow, click the arrow and then click Annotations.
4. At the top right of the annotations editor click Add Annotation and choose note from the list.
5. You will notice the annotation appears on the timeline.
6. Click it to select it and drag it to where you want it to show during your video.
7. Make any fine adjustments by using the zoom tool and then dragging the left and right edges of the annotation on the timeline.
8. Now lets add “Subscribe” text to the annotation by entering it in the Annotation text input field.
9. Now go down to the style options and choose the font size icon and increase its size to a larger 28.
10. We want to add a background colour to it too so in the style options using the background fill tool change it to a nice red.
11. Now that we have that done we are going to position the annotation on screen and adjust its size a little.
12. Click within the annotation showing as a preview and drag it to the top right corner of the video preview and drag the corners until it looks right for you.
13. Now come down to the bottom and check the link checkbox to reveal link options.
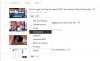
14. You will see a dropdown box that has Video written there, change it to Subscribe like in the picture below.
15. In the text field type in your own channel username for example YTtalkTV would be ours.
16. Now that is your annotation complete, go to the top of the page, click save or publish.
17. You can now see your annotation when watching your video and it links to subscribe to your channel.
Adding a Spotlight Annotation and Linking it
A spotlight annotation is created very similarly to the above steps like so -
1. In your video manager on youtube here: https://www.youtube.com/my_videos
2. Find the video you want to add annotations to.
3. Where the edit button is you will notice an arrow, click the arrow and then click Annotations.
4. At the top right of the annotations editor click Add Annotation and choose spotlight from the list.
5. You will notice the annotation appears on the timeline.
6. Click it to select it and drag it to where you want it to show during your video.
7. Make any fine adjustments by using the zoom tool and then dragging the left and right edges of the annotation on the timeline.
8. Now that we have that done we are going to position the annotation on screen and adjust its size a little.
9. Click within the annotation showing as a preview and drag it to where you want it and adjust its corners by clicking and dragging until it looks right for you.
13. Now come down to the bottom and check the link checkbox to reveal link options.
14. You will see a dropdown box that has Video written there, change it to Subscribe like in the picture below.
15. In the text field type in your own channel username for example YTtalkTV would be ours.
16. Now that is your annotation complete, go to the top of the page, click save or publish.
17. You can now see your annotation when watching your video and it links to subscribe to your channel when hovering the spotlight.
Annotations - Good Practice Tips
I see annotations as a way to guide and help the viewer, they should always have a purpose and help the viewer to engage and interact with your content. To achieve this you can follow my good practice tips below to ensure you are using your annotations effectively:
1. Plan annotations out before recording - Fit them into your script, think about when you are going to annotate within your video for example if you are giving a channel a shout out, you could plan to point to an image of their channel which utilises a spotlight annotation to their channel. Consider where you can place them before you begin to record.
2. Outro/End Cards - If you have an outro or an end card annotations should be used here as a way to engage with your viewers and hopefully get them to keep watching your content, this is why an end card or outro is important as you want them to stay with you and not leave to watch other channels videos. I recommend using a subscribe annotation here, linking either to previous videos or whole playlists with thumbnails at the end of your video.
3. Use annotations but don't overuse them - if you bombard your viewers with annotations they may become annoyed by them, use them well but not constantly and they will perform better.
4. Be creative - Try and use annotations in a way which is fairly original if you can, there are people who use them as navigation systems within their videos with skip to the end or replay from the start annotations, there's people using them to create custom endings where the viewer chooses the ending to their videos and you can be creative too, annotations are another way you can help your videos stand out from the crowd.

5. Timing and Analytics - Think about when you are using them within your videos, a subscribe note annotation may work very well at the start for some people but is it working for you? Check your click through rate of your annotations in your analytics and see if changing them or deleting them could work better for you. Change up the timing of your annotations if you keep them one way for a very long time, annotations can suffer in similar ways to advertisements do with ad blindness but of course don't stray too much if they work very well with your branding.
I hope these tips and the rest of this guide have helped you, if you have any questions or have tips for others please feel free to share them below and ask away") Thanks for reading.
Thanks for reading.
First of all let me explain what annotations are, annotations are a feature on YouTube that allows you to place an overlay on your video and add text to it or link it. They are commonly used as call to actions and as a way of getting the viewer to interact with your videos.
You will see these in many videos across YouTube and they add an interactive element to your videos. Annotations give you the power to create clear call to actions within your videos, for example if you verbally remind viewers towards the end of your video to subscribe you can place a note annotation linking to subscribe to your channel to make it a whole lot easier for them to subscribe. It is all about making things easier for the viewer to engage and interact with your content by guiding them with notes and links and hopefully converting their clicks into an action such as subscribing, viewing more of your videos and so on.
So how do you add annotations to your videos you might wonder? Adding them is simple mostly although it can become a tedious task after you have recorded, edited, uploaded and then SEO’d your video, not another step is what so many people think but it is certainly worth it if you want your video to have the best chances at performing well on YouTube and to give your viewers a chance to engage with your content.
Types of Annotations
So lets look at the few types of annotations that are available to us and what each annotation does and looks like on a video, we have:
Speech Bubble - Speech bubbles are exactly what they say they are, they look like a speech bubble, you can add text to them and adjust the bottom triangle to position it correctly when using it.
Note - This is one of the most commonly used annotations, the note provides a space for text, can be adjusted in size, can be linked and have its background colour changed.
Title - The title annotation is great if you want to add a title to your video at the start, this one is not used as often as some of the others.
Spotlight - The spotlight is my personal favourite, allowing you to highlight a portion of the video and link it, this is perfect for linking in video graphics to other videos, channels and so much more, you are only limited by your creativity when using the spotlight annotation.
Label - Labels are less common but are very useful when you want to label parts of your video for example if you had several pictures that were shown, you might wish to label them using the label annotation. The label looks like a spotlight annotation until hovered which reveal the text label.
A Look At The Annotation Editor
So lets take a look at the annotations editor in a bit more depth so we know what each part of it does and how it works before actually using it, feel free to dive right in and play around with the features as many people prefer to learn by doing it for themselves like myself:
From top to bottom we have the following features and their uses:
Save & Publish Annotations - This is used once your annotations are complete or you can use Save to save them for later but not publish them. Once published they are displayed publicly on your video.
Add New Annotation - The Add Annotation button is where you will be begin to add annotations, clicking it reveals the annotation types such as note, spotlight and label.
Annotation Jump Selector - This allows you to jump and select the various annotations in your video easily and quickly, I don't use this feature much at all to be honest but its there for when you need it.
Adjustable Annotation Preview - When in the annotation editor you see previews of your annotations and can enlarge or shrink them by dragging the corners and reposition them by clicking and dragging them to a new spot.
Delete Annotation - It’s a trash can and we put rubbish in those, the same applies here, if you want rid of an annotation, click and select the annotation then delete it using this button.
Annotation Text Input - This field allows you to fill in the text you wish to add to your annotation.
Annotation Style Options - These change depending on the chosen annotation type and include font size, background colours and text colours.
Annotation Start/End - This shows you exactly when the annotation starts and when the annotation ends.
Annotation Link Options - Check this box to pull up more options for linking your annotations.
Timeline Slider - This slider when clicked and dragged allows you to move along the timeline, similar to in your video editing software.
Note Annotation - The annotation placed on the timeline is a note annotation, it is currently selected and these are adjustable by clicking and dragging the left or right sides to lengthen the duration which is shows for.
Timeline Slider - See above for more information.
Timeline Zoom For Precise Adjustments - You can use this tool to zoom into the timeline and make fine adjustments to your annotation length.
How to Add Annotations to Your Videos
Depending on how you are using them you will need to decide which ones you are going to use and whether they are suitable for what you wish to achieve. For example a Note annotation will cover up a part of your video where you might want the annotation to be transparent which would mean the spotlight annotation would be a better choice. You might want to have an image in your video link to another video or channel, the possibilities are endless.
Adding a Note Annotation and Linking it
Lets add a note annotation to our video, make some adjustments and then link it so that when the viewer clicks it, it takes them to our channel to subscribe.
1. In your video manager on youtube here: https://www.youtube.com/my_videos
2. Find the video you want to add annotations to.
3. Where the edit button is you will notice an arrow, click the arrow and then click Annotations.
4. At the top right of the annotations editor click Add Annotation and choose note from the list.
5. You will notice the annotation appears on the timeline.
6. Click it to select it and drag it to where you want it to show during your video.
7. Make any fine adjustments by using the zoom tool and then dragging the left and right edges of the annotation on the timeline.
8. Now lets add “Subscribe” text to the annotation by entering it in the Annotation text input field.
9. Now go down to the style options and choose the font size icon and increase its size to a larger 28.
10. We want to add a background colour to it too so in the style options using the background fill tool change it to a nice red.
11. Now that we have that done we are going to position the annotation on screen and adjust its size a little.
12. Click within the annotation showing as a preview and drag it to the top right corner of the video preview and drag the corners until it looks right for you.
13. Now come down to the bottom and check the link checkbox to reveal link options.
14. You will see a dropdown box that has Video written there, change it to Subscribe like in the picture below.
15. In the text field type in your own channel username for example YTtalkTV would be ours.
16. Now that is your annotation complete, go to the top of the page, click save or publish.
17. You can now see your annotation when watching your video and it links to subscribe to your channel.
Adding a Spotlight Annotation and Linking it
A spotlight annotation is created very similarly to the above steps like so -
1. In your video manager on youtube here: https://www.youtube.com/my_videos
2. Find the video you want to add annotations to.
3. Where the edit button is you will notice an arrow, click the arrow and then click Annotations.
4. At the top right of the annotations editor click Add Annotation and choose spotlight from the list.
5. You will notice the annotation appears on the timeline.
6. Click it to select it and drag it to where you want it to show during your video.
7. Make any fine adjustments by using the zoom tool and then dragging the left and right edges of the annotation on the timeline.
8. Now that we have that done we are going to position the annotation on screen and adjust its size a little.
9. Click within the annotation showing as a preview and drag it to where you want it and adjust its corners by clicking and dragging until it looks right for you.
13. Now come down to the bottom and check the link checkbox to reveal link options.
14. You will see a dropdown box that has Video written there, change it to Subscribe like in the picture below.
15. In the text field type in your own channel username for example YTtalkTV would be ours.
16. Now that is your annotation complete, go to the top of the page, click save or publish.
17. You can now see your annotation when watching your video and it links to subscribe to your channel when hovering the spotlight.
Annotations - Good Practice Tips
I see annotations as a way to guide and help the viewer, they should always have a purpose and help the viewer to engage and interact with your content. To achieve this you can follow my good practice tips below to ensure you are using your annotations effectively:
1. Plan annotations out before recording - Fit them into your script, think about when you are going to annotate within your video for example if you are giving a channel a shout out, you could plan to point to an image of their channel which utilises a spotlight annotation to their channel. Consider where you can place them before you begin to record.
2. Outro/End Cards - If you have an outro or an end card annotations should be used here as a way to engage with your viewers and hopefully get them to keep watching your content, this is why an end card or outro is important as you want them to stay with you and not leave to watch other channels videos. I recommend using a subscribe annotation here, linking either to previous videos or whole playlists with thumbnails at the end of your video.
3. Use annotations but don't overuse them - if you bombard your viewers with annotations they may become annoyed by them, use them well but not constantly and they will perform better.
4. Be creative - Try and use annotations in a way which is fairly original if you can, there are people who use them as navigation systems within their videos with skip to the end or replay from the start annotations, there's people using them to create custom endings where the viewer chooses the ending to their videos and you can be creative too, annotations are another way you can help your videos stand out from the crowd.
5. Timing and Analytics - Think about when you are using them within your videos, a subscribe note annotation may work very well at the start for some people but is it working for you? Check your click through rate of your annotations in your analytics and see if changing them or deleting them could work better for you. Change up the timing of your annotations if you keep them one way for a very long time, annotations can suffer in similar ways to advertisements do with ad blindness but of course don't stray too much if they work very well with your branding.
I hope these tips and the rest of this guide have helped you, if you have any questions or have tips for others please feel free to share them below and ask away
Thanks for reading.Attachments
-
 52.7 KB Views: 1
 -
 45 KB Views: 1
 -
 23.9 KB Views: 1
 -
 187.7 KB Views: 2

